Sunday, January 30, 2011

Fun New Items at Really Reasonable Ribbon

Hi everyone and Happy Sunday!  Today I'm going to show you some of the fun new ribbon styles that have arrived at Really Reasonable Ribbon for Spring.

We have added lots of great new satin styles, seam binding in a variety of colors, beautiful crochet lace styles, 4 fun new colors of baker's twine, and lots of new printed grosgrain styles.  We've also added several fun new assortments if you want to try some of these styles out.  Below you will find a sampling of our new items.

Below is a sample of two of our new natural crochet lace items.  Stop by our website to see our entire line of crochet lace.
Our 5/8" diamond satin comes in a wide variety of colors and also this beautiful spring assortment pack.


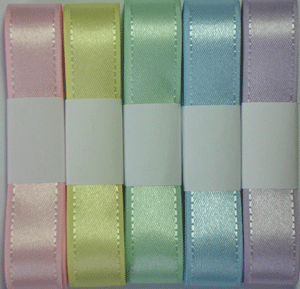
 Our satin with grosgrain edge ribbon is a beautiful double-faced satin with a delicate stitched edge.  It is available in 5/8", 7/8", and 1" widths in a wide variety of colors.  We are also offering the 5/8" width in two different assortment packs.  One is the spring assortment below.


This fun new vertical stripe grosgrain is one of my favorites.  Isn't it great for Spring?  It's available in a 3/8" width in 6 colors and also in the great assortment below.


Our baker's twine is now available in 12 delicious colors.  We recently added four new colors; air mail (red, white and blue combo), brown sugar, plum and blueberry.  All of the colors are available individually in either a 10-yard piece or a 240-yard spool.  We also offer a 60 yard baker's twine assortment with 5 yards each of all 12 colors.  For a limited time we are also offering a baker's twine mini-assortment containing the 4 new colors.

This is just a small sampling of the great offering you will find at Really Reasonable Ribbon.  Don't forget we have a full selection of great styles for Valentine's Day.  We've also added a Spring category to help you find all of our styles to use on your Spring projects.

We also have lots of fun events coming up on the RRR blog.  On February 11th we will be participating in a Blog Hop with Helmar, Nikki Sivils, Prima, PSA Essentials, Purple Onion Designs and Urban Swank.  You'll want to mark you calendars for this one!

For our February RRR blog hop on the 13th of February, we will be joining our friends from Sparkle N Sprinkle.  That means double the fun!!

We're also working on a special theme week in March and we're going to show you all of our best ribbon organizing ideas.  Stay tuned for more information on that.

~ Bonnie Garby ~


Saturday, January 29, 2011

Heart Gift Box


Hello!  I had so much fun making a heart box for the blog hop this month, I just had to make another one!  This time I used this adorable image from C. C. Designs Swiss Pixie Violet with Key, some dp from the K & Co. Sweet Talk Paper pad, some beautiful paper flowers from Wild Orchid Crafts, and some of my FAVORITE Red Shimmer Satin Ribbon which is in this month's Ribbon Club Assortment and can also be found HERE!

I originally found the tutorial for the box HERE, but here are some quick directions:


Cut 2 squares.  One 4" square and one 4 1/8" square.


Score all sides of both squares at the 1" mark.


Cut like so


Get out your handy Scor-Tape which you can find at the RRR Store HERE!


Add tape to tabs and secure.


Simple as that! 


Now fill with some gorgeous ribbon from Really Reasonable Ribbon

I hope you have a wonderful, crafty Saturday:)  Thank you so much for stopping by!

Kerri


Friday, January 28, 2011

Birthday Gift Set

 
Hello everyone and Happy Friday!!  Wooohooo, the weekend is here :) hehehehehe.  Anyway, today I have a birthday gift set made using the cricut and Really Reasonable Ribbon!!

For my gift set I made a gift box and matching card.  The gift box was cut with the cricut using tags, bags, and boxes cartridge.  I used Really Reasonable Ribbon's Pink Satin 1" found here and I also used the red ribbon from the Ribbon Club assortment found HEREI love making gift sets.  They are perfect for giving for birthdays and such!!

I added a handle to the box using 1" pink satin ribbon and I also added a bow to each side with a flower (wild orchid). My sentiment is Heartfelt Creations.

For my card I did the same using ribbon from the monthly ribbon club assortment and the 1" pink satin.

I really had a lot of fun making this gift set and will be giving this to my mother-in-law for her birthday at the end of February.
Supplies Used:
Really Reasonable Ribbon/Monthly club kit, and pink satin ribbon
Dp/Bo Bunny (sent to me by a dear friend Tami)
Flowers/Wild Orchid
Stamps/Heartfelt Creations
Pearls pizzazz aplenty
Martha Stewart punches

Thank you for looking and have a lovely weekend!!!
Hugs,
Cheryl

Thursday, January 27, 2011

Boys' Bookmarks

Today I don't have any doilies or ruffles or pink. Nope. Today, I have a project for my two boys, who love to read. As a former English teacher, I really want to encourage them to keep up that good habit. I buy them books. I read with them. We celebrate when they finish a book. So for our next celebration, I made them each a cute little bookmark.

Boys' Bookmarks

Each bookmark was created with a 12" strip of ribbon topped with chipboard and finished with a layered circle and their initials. For the soccer bookmark, I used 7/8 Inch Black Gingham, Red 3/8 Inch Red Rik Rak, and Cherry Baker's Twine. And on the helicopter bookmark, I used 3/8 Inch Dark Grey Grosgrain and Oyster Baker's Twine.

This was such a quick and simple project, buy my boys are going to love it. I think I'll make some more. Maybe I'll do some with hearts at the bottom to give them with their Valentine treats. Or maybe some with crosses for them to use in their Bibles. So many possibilities!

Thanks for stopping by today! Aphra

Wednesday, January 26, 2011

And our BLOGOVERSARY PRIZE WINNER IS................

This is our second post of the day.  Please scroll down so you don't miss the fabulous project that Connie has posted for us today.

Hi everyone!  Our blogoversary is finally here!!!  We've had a very enjoyable year blogging with you and we are looking forward to many more. 
I can't believe how many people dropped by to enter for a chance to win our prize.  We had over 700 entries!!  Welcome to all our new friends!  I hope you've had a chance to take a look around and that you will come back and visit us often.  Many thanks to everyone who left comments about what you would like to see on our blog.  You gave us lots of great ideas for the upcoming months.
Now on to selecting the winner of the fabulous prize below which contains a variety of items that can be found at Really Reasonable Ribbon.
And our winning number is...............................
Random Integer Generator
Here is your random number:   707
Timestamp: 2011-01-26 18:14:16 UTC

Congratulations Victorias from victoriasjunk.blogspot.com!
Please contact us using the contact link above within 48 hours to claim your prize.
Now if you didn't win, no worries.  We will be having another fun giveaway soon. 
Thanks so much everyone and have a terrific day!
~ Bonnie Garby ~


Really Reasonable Ribbon's One Year Blogoversary Giveaway!

This post will remain on top until the drawing on 1/26.  Please scroll down for the new daily posts.

It's hard for me to believe, but we are rapidly approaching our one year blog anniversary already!  We've come a long way in just one year, and we have all our readers to thank for that!

As a thank you we will be giving away the huge collection of merchandise below (valued at over $75) to one lucky winner.

All of the items in this prize assortment can be found on the Really Reasonable Ribbon website. Along with our huge selection of ribbon, you can also find lots of great adhesive items, the Scor-Buddy Mini Scoring tablet, and many great embellishments. Be sure to stop over at our website today and take a look around.

How do you sign up for a chance to win this great prize?

We'd love to have you do one or more of the following:

•Become a follower. We LOVE having you come by and our followers help us out in so many ways.
•Grab our 'I love RRR' badge and display it on your blog (it's located at the top of the right column).
•Tell your friends about us and our giveaway. Blog about it, twitter it, facebook it or just tell a friend.

In order to be entered in the drawing, please use the Inlinkz tool below and enter the appropriate information.  (The drawing will be made using the entries from the Inlinkz list only, not the comments.)

We also have an optional question and we'd love to hear from you in the comments section.  The question this time around is - 'What would you like to see from our design team member in the new year?'

We love our readers and we want to show you what you want to see.  We are busily working on finding the ribbon styles you requested from the last question we posed.  Now we want to know what you want to see on our blog.  We're all ears and we can't wait to hear what you have to say.

The Blogoversary Giveaway will be opened until 12:59 PM EST on Wednesday, 1/26.  The winner will be announced on this blog shortly after the drawing closes.  We will select the  winner randomly from the list of entries from the Inlinkz tool below. 

Be sure to check back on 1/26 to see if you are our lucky winner.  Good Luck to all!

~ Bonnie Garby ~


*** NOTEThe Inlinkz tool requires a URL (which I didn't realize).  You are welcome to enter even if you don't have a blogJust use the RRR blog URL - www.reasonableribbon.blogspot.com .  Sorry folks, this is the first time I've used the Inlinkz tool for this purpose and apparently I have a lot to learn!  It will only accept a URL once, so my initial idea won't work.  What you can do if you don't have a blog is just make up a URL.  (Example, www.zzr.com.- but use your own random letters between www and com.)  Sorry for any inconvenience.

Fishing Net or Jute Ribbon? :)


Hello! Boy did I have fun with today's card. I so love this Cream Jute Ribbon from the Really Reasonable Ribbon Store! When I first saw it I immediately thought of a fishing net, then Our Daily Bread Designs stamps came out with these wonderful Christian Fish symbol stamps that will be released on February 1st, and I saw a perfect match! LOL!!


Here I stamped the image on crumb cake/kraft paper and then distressed it with some walnut stain distress ink. The background panel was stamped with the fish background stamp (also from ODBD to be released Feb. 1st), and also distressed. I then placed the wonderful cream jute ribbon over the background, and the fish image over the jute ribbon! Simple, yet powerful! :)


Thanks so much for visiting today! For more project with ribbon from the Really Reasonable Ribbon store, you can head over to my blog!


Connie

Card Details:
Image: Christian Fish Symbol - Jesus - ODBD
Paper: Kraft/crumb cake, soft suede, early espresso
Inks: Walnut stain distress ink
Accessories: Antique Brass Brads, Cream Jute Ribbon from the Really Reasonable Ribbon store, distressing tool, sponge

Tuesday, January 25, 2011

A Valentine for a little boy

I often get orders for special cards, and if you've been visiting my blog for awhile you will have seen these ones.  Apparently the 8 year old brother of that little girl was very jealous when she got hers, so I was asked by their Grandma to make him a special one too to keep the sibling rivalry at bay!  He apparently loves robots, so I hope this one will make him happy on Valentine's Day.  In the up-close pic you will see that the matchbox drawer slides open and inside it are lots of cute puffy hearts from Really Reasonable Ribbon and a little folded piece of notepaper for the love note!  It's not too 'girly', so I hope he likes it.


Monday, January 24, 2011

Birthday card featuring a ribbon rosette, ribbon rose, and handmade stick pin

Hi everyone:

It's Jess from KinderStampO and I am the guest designer today. Since I am celebrating my birthday this month I decided to make a birthday card featuring a ribbon rosette and ribbon rose.

I also made four videos to show you how to make the ribbon rosette, ribbon rose, stick pin and birthday card.  The ribbon used today is from the shimmer satin assortment from Really Reasonable Ribbon.

If you love this ribbon just as much as I do ... please stop by my blog to enter to win a set generously sponsored by Really Reasonable Ribbon.


How to make a stick pin


How to make a ribbon rosette


How to make a ribbon rose


How to make the birthday card


Happy Crafting,

Jess

Sunday, January 23, 2011

Waiting for the Valentines!!!!


Happy Sunday everyone from Jacque and all of the Really Reasonable Ribbon Ramblers! We hope you are having a great weekend wherever you may be!

Valentine's Day is just around the corner and I took this opportunity to complete a little project for that special someone. Of course all of the ribbons and trims I used are from the January RIBBON CLUB Assortment and you should check them out if you are not yet a member!! They are sooooooo Valentine-y!!!


All I actually did was to decide upon an image which happens to be Tilda waiting on the mail and adhered her to a little dollar red mailbox from Target or Michaels and then started trimming the mailbox with lovely ribbons from the RRR shop: Heart Outlines on Red Grosgrain, Shimmer Satin Red, and White Satin. I also used several layers of the Puffy Red Hearts in Line to make the shingles on the roof and to decorate the envelope on the back of the mailbox.
On the back of the mailbox I used the same ribbons to cover the flag stand.

I hope you like my little RRR creation and will drop by here every day to see the exciting cards and projects which await you. Big hugs coming your way!!!

Saturday, January 22, 2011

Welcome Baby Boy


Hello!  I don't know about you, but I'm sure glad it's the weekend!  This week has been really busy and I'm ready to relax and get crafty:) 

A friend of mine asked if I could make a baby boy card for her, so I pulled out this darling image from The Greeting Farm set Oh Baby.  I used the last of my awesome Brown Wrinkled Ribbon on this card *sniff* so I definitely need to order more!!!  I also used some fabulous White Jute String to tie my button to my bow.  LOVE that stuff!  The dp is My Mind's Eye Fine & Dandy True Blue. 

I hope you have a wonderful weekend!  Thank you so much for stopping by and I'll see you next Saturday!

Kerri

Friday, January 21, 2011

Ribbon dyeing with copics and airbrushing

Hello everyone and Happy Friday to all!  Today I'm sharing a ribbon dyeing technique that I love using. Its easy to do, and super fast!!
Its also nice to have ribbon to match your copics :)  For my bow I used white Grosgrain ribbon from Really Reasonable Ribbon found here! I hope you enjoy my video below, and I will be sharing a couple more videos on dyeing ribbon and laces soon.

Supplies Used:
Ribbon/White Grosgrain(Really Reasonable Ribbon)
Dp is basicgrey
stamps and matching diecuts (heartfelt Creations)
sewing
stickles
Thank you for looking and I hope you have a wonderful weekend!
Hugs, Cheryl

Thursday, January 20, 2011

Rik Rak Rosette

Hiya Ramblers. Hope everyone is nice and toasty and indoors today. We are having a little break from the cold weather and it is gorgeous. Almost didn't want to stay inside and craft yesterday, but that's just crazy talk, right? Ha, ha. Anyhoo, I have a fun little tutorial for ya today. We're making a Rik Rak Rosette.

Make A Wish Card

Here we go. First, gather your supplies: ribbon, coordinating rik rak, needle, thread, scissors, and adhesive. In my photo, you see my scrapbook adhesive, but I actually used a glue gun for parts of the flower.

Cut a strip of ribbon about 18" long. I used 1.5" Wired Woven Check in Pink. Stitch a running stitch along one side of the ribbon. I like to use really wide stitches so that the flower will have wide ruffles.

When you have stitched to the end, scrunch the ribbon up along string and stitch the two ends together.

Create a second ribbon loop with a smaller width ribbon. I used Snow Cone Stripe 7/8" Grosgrain. Such a nice color combination, don't ya think? On this second one, though, I didn't pull it as tight, so there would be a bit of an opening in the center.

Glue the smaller ribbon loope on top of the larger one. For this step, I used my Imaginisce I-Bond, their new cordless glue gun. LOVE it! If you don't have a glue gun, you could use fabric glue or even glue dots.

Ok, now here's my favorite part. You need a piece of 3/8" rik rak in a coordinating color to create your center. I used Light Blue Turquoise. Place a bit of glue on the end and then start rolling. Add dabs of glue every couple of rolls or so to keep it tight. When it gets to be the size you like, trim it and glue down the end.


Glue your little rik rak rosette to the center of your layered ribbon loops. Oh. My. Gosh. I LOVE that little center.

Well, I hope you are inspired to buy up all of Bonnie's rik rak and create yourself some little rosettes. I can see myself using these in lots more projects!

Have a great day! Aphra